ConstrainedDelaunay2D
Repository source: ConstrainedDelaunay2D
Description
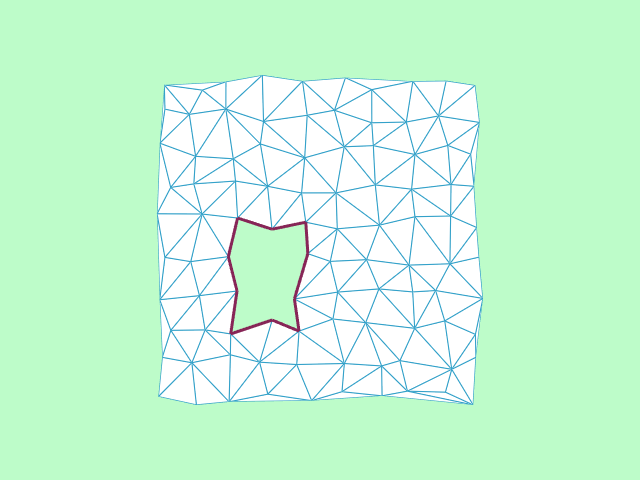
Perform a 2D Delaunay triangulation respecting a specified boundary. This examples constructs a 10x10 grid of points. It then defines a polygon that uses the points in the grid. We want to triangulate all of the points except the region inside the boundary of the polygon. We expect a rectangular hole of size 4x3 in the resulting triangulated plane.
Other languages
See (Python), (PythonicAPI)
Question
If you have a question about this example, please use the VTK Discourse Forum
Code
ConstrainedDelaunay2D.cxx
#include <vtkActor.h>
#include <vtkCellArray.h>
#include <vtkDelaunay2D.h>
#include <vtkMinimalStandardRandomSequence.h>
#include <vtkNamedColors.h>
#include <vtkNew.h>
#include <vtkPoints.h>
#include <vtkPolyData.h>
#include <vtkPolyDataMapper.h>
#include <vtkPolygon.h>
#include <vtkProperty.h>
#include <vtkRenderWindow.h>
#include <vtkRenderWindowInteractor.h>
#include <vtkRenderer.h>

int main(int, char*[])
{
  vtkNew<vtkNamedColors> colors;

  // Generate a 10 x 10 grid of points
  vtkNew<vtkPoints> points;
  unsigned int gridSize = 10;
  unsigned int seed = 0;
  vtkNew<vtkMinimalStandardRandomSequence> randomSequence;
  randomSequence->Initialize(seed);
  for (unsigned int x = 0; x < gridSize; x++)
  {
    for (unsigned int y = 0; y < gridSize; y++)
    {
      auto d1 = randomSequence->GetValue() / 2.0 - 0.25;
      randomSequence->Next();
      auto d2 = randomSequence->GetValue() / 2.0 - 0.25;
      randomSequence->Next();
      points->InsertNextPoint(x + d1, y + d2, 0);
    }
  }

  vtkNew<vtkPolyData> aPolyData;
  aPolyData->SetPoints(points);

  // Create a cell array to store the polygon in
  vtkNew<vtkCellArray> aCellArray;

  // Define a polygonal hole with a clockwise polygon
  vtkNew<vtkPolygon> aPolygon;

  aPolygon->GetPointIds()->InsertNextId(22);
  aPolygon->GetPointIds()->InsertNextId(23);
  aPolygon->GetPointIds()->InsertNextId(24);
  aPolygon->GetPointIds()->InsertNextId(25);
  aPolygon->GetPointIds()->InsertNextId(35);
  aPolygon->GetPointIds()->InsertNextId(45);
  aPolygon->GetPointIds()->InsertNextId(44);
  aPolygon->GetPointIds()->InsertNextId(43);
  aPolygon->GetPointIds()->InsertNextId(42);
  aPolygon->GetPointIds()->InsertNextId(32);

  aCellArray->InsertNextCell(aPolygon);

  // Create a polydata to store the boundary. The points must be the
  // same as the points we will triangulate.
  vtkNew<vtkPolyData> boundary;
  boundary->SetPoints(aPolyData->GetPoints());
  boundary->SetPolys(aCellArray);

  // Triangulate the grid points
  vtkNew<vtkDelaunay2D> delaunay;
  delaunay->SetInputData(aPolyData);
  delaunay->SetSourceData(boundary);

  // Visualize
  vtkNew<vtkPolyDataMapper> meshMapper;
  meshMapper->SetInputConnection(delaunay->GetOutputPort());

  vtkNew<vtkActor> meshActor;
  meshActor->SetMapper(meshMapper);
  meshActor->GetProperty()->EdgeVisibilityOn();
  meshActor->GetProperty()->SetEdgeColor(
      colors->GetColor3d("Peacock").GetData());
  meshActor->GetProperty()->SetInterpolationToFlat();

  vtkNew<vtkPolyDataMapper> boundaryMapper;
  boundaryMapper->SetInputData(boundary);

  vtkNew<vtkActor> boundaryActor;
  boundaryActor->SetMapper(boundaryMapper);
  boundaryActor->GetProperty()->SetColor(
      colors->GetColor3d("Raspberry").GetData());
  boundaryActor->GetProperty()->SetLineWidth(3);
  boundaryActor->GetProperty()->EdgeVisibilityOn();
  boundaryActor->GetProperty()->SetEdgeColor(
      colors->GetColor3d("Red").GetData());
  boundaryActor->GetProperty()->SetRepresentationToWireframe();

  // Create a renderer, render window, and interactor
  vtkNew<vtkRenderer> renderer;
  vtkNew<vtkRenderWindow> renderWindow;
  renderWindow->AddRenderer(renderer);
  vtkNew<vtkRenderWindowInteractor> renderWindowInteractor;
  renderWindowInteractor->SetRenderWindow(renderWindow);

  // Add the actor to the scene
  renderer->AddActor(meshActor);
  renderer->AddActor(boundaryActor);
  renderer->SetBackground(colors->GetColor3d("Mint").GetData());

  // Render and interact
  renderWindow->SetSize(640, 480);
  renderWindow->SetWindowName("ConstrainedDelaunay2D");
  renderWindow->Render();
  renderWindowInteractor->Start();

  return EXIT_SUCCESS;
}
CMakeLists.txt
cmake_minimum_required(VERSION 3.12 FATAL_ERROR)

project(ConstrainedDelaunay2D)

find_package(VTK COMPONENTS
  CommonColor
  CommonCore
  CommonDataModel
  FiltersCore
  InteractionStyle
  RenderingContextOpenGL2
  RenderingCore
  RenderingFreeType
  RenderingGL2PSOpenGL2
  RenderingOpenGL2
)

if (NOT VTK_FOUND)
  message(FATAL_ERROR "ConstrainedDelaunay2D: Unable to find the VTK build folder.")
endif()

# Prevent a "command line is too long" failure in Windows.
set(CMAKE_NINJA_FORCE_RESPONSE_FILE "ON" CACHE BOOL "Force Ninja to use response files.")
add_executable(ConstrainedDelaunay2D MACOSX_BUNDLE ConstrainedDelaunay2D.cxx )
  target_link_libraries(ConstrainedDelaunay2D PRIVATE ${VTK_LIBRARIES}
)
# vtk_module_autoinit is needed
vtk_module_autoinit(
  TARGETS ConstrainedDelaunay2D
  MODULES ${VTK_LIBRARIES}
)
Download and Build ConstrainedDelaunay2D
Click here to download ConstrainedDelaunay2D and its CMakeLists.txt file. Once the tarball ConstrainedDelaunay2D.tar has been downloaded and extracted,
cd ConstrainedDelaunay2D/build
If VTK is installed:
cmake ..
If VTK is not installed but compiled on your system, you will need to specify the path to your VTK build:
cmake -DVTK_DIR:PATH=/home/me/vtk_build ..
Build the project:
make
and run it:
./ConstrainedDelaunay2D
WINDOWS USERS
Be sure to add the VTK bin directory to your path. This will resolve the VTK dll's at run time.